Website Settings
The Website Settings feature in Syteville allows you to configure the core information and appearance of your website, ensuring it reflects your brand and meets customer expectations. Located under the Settings tab in the Left Sidebar, Website Settings is the first option at the top left. This guide explains how to set up and manage the three sections of Website Settings:
Accessing Website Settings
Navigate to Website Settings: In the Left Sidebar, click Settings, then select Website Settings (the first option at the top left).
Website Settings Sections

This section allows you to upload logos that represent your brand across different parts of your website:
Website Logo: The logo displayed on your website’s pages.
Invoice Logo: The logo shown on customer order receipts.
Favicon Logo: The small icon displayed in the browser tab for your website.
Upload the desired images for each logo type to ensure a consistent brand identity.
2. Information & Analytics Section
This section includes essential details about your business that will be visible to customers and analytics settings for monitoring website performance :
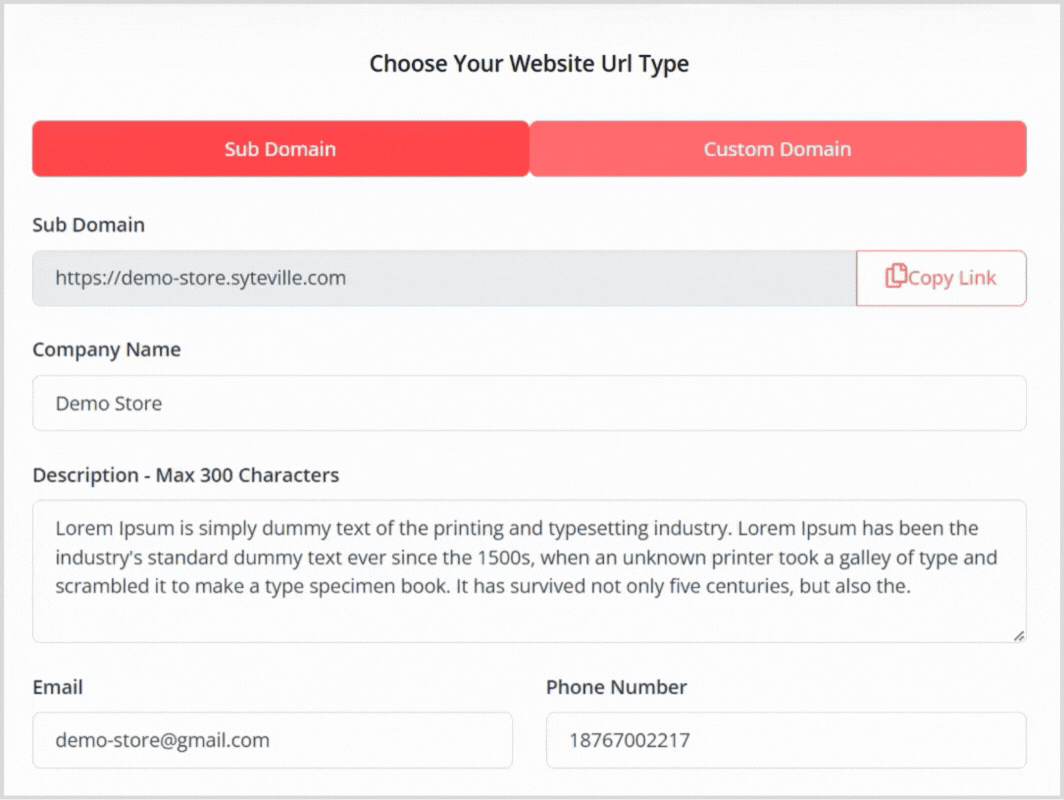
Website URL Type: Choose between a subdomain (e.g., yoursite.syteville.com) or a custom domain (e.g., yoursite.com).
Company Name: Your business or organisation name.
Description: A brief description of your business or website.
Email: The contact email for your business.
Phone Number: The contact phone number for your business.
Address: Your business’s physical address.
City: The city where your business is located.
State / Parish: The state or parish of your business.
Country: The country where your business operates.
Zipcode: The postal code for your business’s location.
Opening Hours: Your business’s operating hours.
Website Colour: Select the primary colour scheme for your website.
Default Language: Set the default language for your website.
Google Analytics: Add your Google Analytics tracking ID to monitor website performance.
Facebook Pixel: Add your Facebook Pixel ID for advertising and analytics.
Tawk.to Live Chat Button: Enable a live chat feature by adding your Tawk.to widget code.
Meta Keywords: Add keywords for search engine optimisation (SEO).
Meta Description: Provide a brief description for SEO purposes.
3. Toggle Button Section

This section includes customizable settings to control website functionality and customer experience:
Display Review Scores on All Website Modules: Enable to show customer ratings for products or services on each module.
Customer Login Is Required to Place Orders?: Enable to require customers to create an account before checking out.
Display Blog Menu on the Website Header?: Enable to show a blog menu link in the website’s header.
Enable Website Loyalty Reward Points System: Enable customers to earn points for completing actions (e.g., purchases), which can be redeemed for rewards.
Disable Shipping for Digital Products Website?: Enable to skip collecting shipping information during checkout for digital products.
Enable Pickup Delivery Method for Orders?: Enable to offer customers a pickup location option instead of delivery.
Saving Changes
Once you’ve filled out or updated the information in the Logos, Information, and Toggle Button sections, click the Save button to apply your changes.
Customize Your Website
The Website Settings feature in Syteville empowers you to tailor your website’s appearance and functionality to align with your brand and business needs. From uploading logos to enabling loyalty rewards, these settings help create a seamless and engaging experience for your customers.